There’s something almost magical about frosting a cake. One minute you’re staring at a couple of plain cake layers, and the next, you’re wielding a spatula like a pastry chef, transforming those humble rounds into something that actually looks like it belongs at a celebration. That first swipe of buttercream, the way it glides across the surface, the moment you step back and see it all come together—that’s what makes all the measuring and oven-watching worthwhile.
But let’s be real: frosting a cake can also be incredibly frustrating. If you’ve ever watched your frosting slide off a too-warm cake, battled an army of crumbs that just won’t stay put, or ended up with lopsided layers that lean like the Tower of Pisa, you know that technique actually matters here. Frosting is part art, part science, and part “please just cooperate with me.”
The good news? Once you understand a few key steps—how to prep your layers, why the crumb coat is non-negotiable, and how to actually smooth frosting without making a mess—you’ll be amazed at what you can pull off. From simple finishes to more elaborate cake decorations, this guide will walk you through everything, whether you’re a complete beginner or just looking to level up your cake game.
Preparing Your Cake for Frosting
Here’s the thing about frosting: the actual frosting part is only half the battle. Most of the work happens before you even pick up your spatula. Skip the prep, and you’re setting yourself up for a frustrating afternoon of sliding frosting and wonky layers.
Cool Completely (Yes, Really)
I know you’re excited. The cake smells amazing, it just came out of the oven, and you want to dig in. But if you frost a warm cake with butter-based frosting, you’re going to end up with a melted, slidey disaster. Trust me on this one.
Let your cake layers cool completely on a wire rack until they’re room temperature. No cheating. For extra insurance (especially if you’re in a warm kitchen), pop those layers in the fridge for 30–60 minutes before you start. If your layers stuck to the pan, use parchment paper next time to prevent this—it makes removing them so much easier. A chilled, firm cake is so much easier to work with—it won’t crumble, tear, or betray you when you need it most.
The cooling process is more important than most people realize. When a cake is warm, its structure is still soft and vulnerable. The heat will literally melt butter-based frostings on contact, causing them to pool at the base or slide right off the sides. Even cream cheese frosting struggles with warmth. Give your cake the time it needs to set properly, and you’ll thank yourself later when everything stays exactly where you put it.
Level Those Layers
Most cakes bake up with a little dome on top. It’s normal, but it’s not helpful when you’re trying to stack layers that won’t wobble. Grab a serrated knife or a cake leveler and trim off those domes until you’ve got flat, even tops. Your future self, trying to stack three layers without engineering a cake catastrophe, will thank you.
When you’re leveling, work slowly and steadily. Use a gentle sawing motion with your serrated knife, and try to keep your hand level as you cut. If you’re nervous about eyeballing it, use toothpicks as markers around the cake to guide your knife at the same height all the way around. Some bakers even freeze their cakes for 15 minutes before leveling—it makes the cutting cleaner and reduces crumbling.
Brush Away the Crumbs
Before you frost, give each layer a gentle brush or wipe to get rid of loose crumbs. It takes five seconds and saves you from a crumb-covered final product. This is one of those small steps that separates “I tried” from “Wait, did you actually make this?”
A pastry brush works perfectly for this, but even a clean paper towel will do the job. Just be gentle—you’re not scrubbing, you’re dusting. Pay special attention to the cut edges where you leveled the cake, since that’s where most of the loose crumbs hang out.
Gather Your Tools
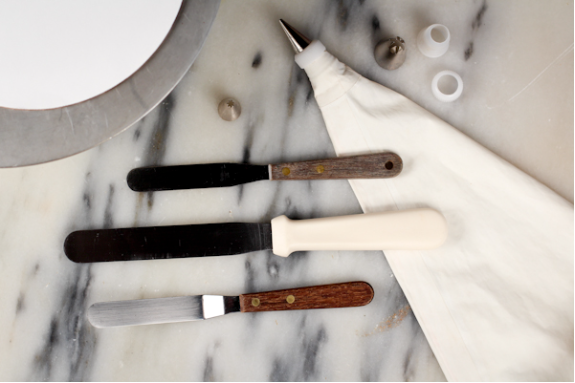
You don’t need a fancy bakery setup, but a few basic tools make this so much easier:
- Cake turntable – A game-changer for smooth frosting
- Offset spatula – Makes spreading frosting way less awkward
- Bench scraper – For those clean, sharp edges
- Piping bag (optional) – If you want to get decorative
- Serrated knife – For leveling
Your Pre-Frosting Checklist
Before you dive in, make sure:
✓ Cake layers are completely cooled (or chilled)
✓ Tops are leveled and flat
✓ Loose crumbs are brushed away
✓ Frosting is made and the right consistency
✓ All your tools are within arm’s reach
Once you’ve got all this sorted, you’re ready for the secret weapon: the crumb coat.
The Crumb Coat — Your Secret Weapon
If you’ve never heard of a crumb coat, this is about to change your cake life. Seriously. This one step is the difference between a cake that looks homemade (in a good way) and one that looks… well, like you wrestled with it.
What Even Is a Crumb Coat?
Think of it as a primer for your cake. It’s a super thin layer of frosting that traps all those pesky crumbs so they don’t show up in your final, pretty layer. Professional bakers always do this step. Always. It’s their secret to those impossibly smooth cakes you see in bakery windows.
The crumb coat doesn’t need to look perfect. In fact, it’s supposed to look a little rough and thin. You should be able to see the cake through it in places. The whole point is just to glue down those crumbs and create a stable base for your final layer of frosting.
How to Apply It
- Put your first layer on the turntable, flat side up (if you trimmed the dome, the bottom of the cake should face down for the most stable base)
- Spread frosting evenly across the top
- Stack your next layer(s), pressing down gently to keep things level
- Now slather a thin layer of frosting all around the sides and top—just enough to seal everything in
- Scrape off the excess until you’ve got a sheer, almost see-through coat (yes, you should be able to see the cake through it)
The Waiting Game
Here’s where patience comes in. After you apply the crumb coat, stick the whole thing in the fridge for 20–30 minutes. This lets the frosting firm up so when you add your final layer, you’re not dragging up crumbs or tearing what you just did. It’s a short wait, but it makes a massive difference.
Use this time to clean your spatulas, make a cup of coffee, or just admire your work so far. When the crumb coat is properly chilled, it’ll feel firm to the touch and won’t smudge when you gently press it.
When Things Go Wrong
| Issue | Why It’s Happening | The Fix |
| Frosting tears the crumb coat | It’s too stiff | Add a splash of milk or cream to loosen it up |
| Frosting slides right off | It’s too thin OR your cake is still warm | Chill the cake, or thicken the frosting with powdered sugar |
| Weird air pockets | You’re moving too fast | Slow down and spread more deliberately |
Get this foundation right, and the final coat will practically apply itself. (Okay, not quite, but it’ll be way easier.)
Applying the Final Layer (The Fun Part)
This is it. This is where your cake goes from “meh” to “Wait, you made this?!” It’s the most satisfying part of the whole process, watching your crumb-coated cake transform into something smooth and gorgeous.
Step-by-Step: The Final Coat
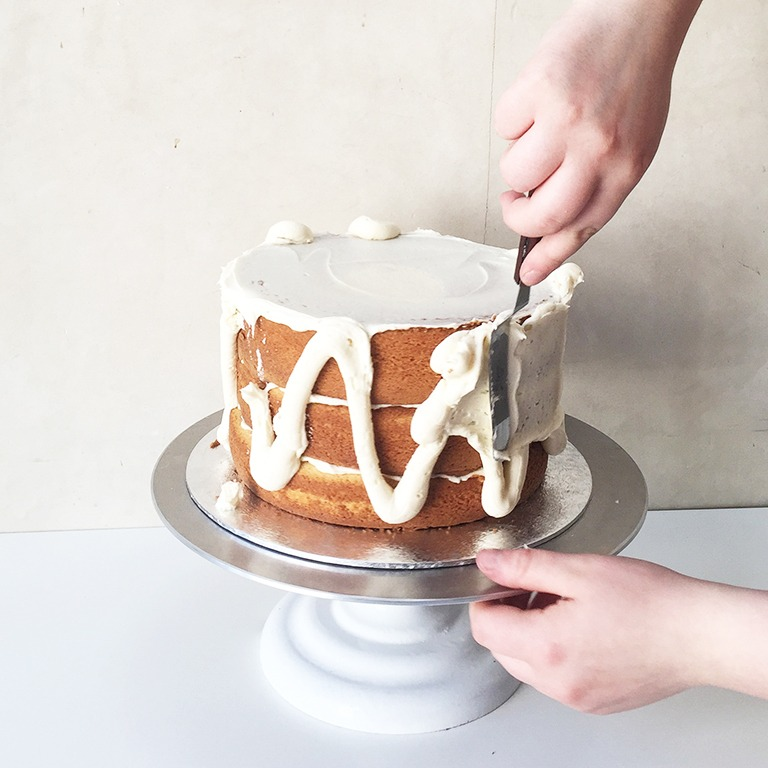
Top First: Pile frosting on the top of the cake and spread it outward in a circular motion. Don’t be stingy—you need enough to work with.
Then the Sides: Apply frosting all around the edges. Let it hang over the top edge slightly; you’ll use that excess in a minute.
Smooth It Out: Here’s where the turntable earns its keep. Hold your bench scraper or offset spatula at a gentle angle against the side of the cake, then slowly rotate the turntable. The cake spins, you hold steady, and the frosting smooths itself out. It’s oddly therapeutic.
Sharpen Those Edges: Use your spatula to pull any extra frosting from the top edge toward the center. This creates those crisp, clean lines that make a cake look professional.
Pick Your Finish Style
| Style | What It Looks Like | When to Use It |
| Smooth finish | Crisp, bakery-perfect look | Birthday cakes, celebrations, when you want to show off |
| Rustic swirl | Soft, swooping strokes with texture | Casual gatherings, when you want that “homemade with love” vibe |
The Warm Water Trick
Want to know a pro secret? Dip your spatula in warm water, wipe off the excess, then gently run it over any bumps or imperfections. The slight warmth melts the buttercream just enough to create a flawless, smooth finish. It’s like magic, but with physics.
Common Mistakes (And How to Fix Them)
| Mistake | The Fix |
| You’re pulling up crumbs | Lighten your pressure, or add more frosting to build up the layer |
| The frosting bulges out weirdly | Chill the cake between coats—it’s too soft |
| Sides look uneven | Check your hand angle and pressure; keep the scraper steady |

Decorating Your Masterpiece
Now comes the creative part—making this cake uniquely yours. You don’t need piping skills or pastry school training. Even the simplest decorations can take a cake from “nice” to “Wow, did you really make that?”
Easy Finishing Touches
- Smooth edges for that classic, elegant look
- Rustic swoops using the back of a spoon (my personal favorite for its “I meant to do that” energy)
- Textured sides with a cake comb dragged around the edges
- Piped borders for a touch of elegance without much effort
If You’re Using Piping Tips
| Tip | What It Does | Best For |
| Star tip | Creates rosettes and decorative borders | Edges or fancy top accents |
| Round tip | Makes dots, pearls, and clean lines | Elegant, minimalist designs |
| Petal tip | Produces ruffles and flower petals | When you’re feeling fancy |
More Decoration Ideas
- Fresh fruit – Berries, citrus slices, or whatever’s in season
- Chocolate ganache drizzle – Because chocolate makes everything better
- Edible flowers – Surprisingly easy to find and instantly impressive
- Sprinkles or sanding sugar – Never underestimate the power of sparkle
- Color-blended buttercream – Ombre effects that look harder than they are
Honestly, even just adding fresh berries to a simply frosted cake can make it look like it came from a fancy bakery. Don’t overthink it.
Troubleshooting & FAQs
Can you frost a warm cake?
No. Just no. Warm cake + butter-based frosting = melted, slidey disaster. Let it cool completely. I know it’s tempting, but resist.
Why does my frosting keep pulling up crumbs?
Your frosting is probably too stiff, or your cake is too soft. Try adding a bit of milk to loosen the frosting, and use a lighter touch. Also—did you do a crumb coat? That helps immensely.
How do I frost without a turntable?
Put your cake on a flat plate and rotate the plate as you work. It’s not quite as smooth, but it absolutely works. I did it this way for years.
Which frosting is easiest for beginners?
Buttercream or whipped frosting are your friends. They’re forgiving and easy to work with. Ganache is beautiful but sets quickly, so timing matters more.
Conclusion: You’ve Got This!
Frosting a cake comes down to three things: chill your layers, nail the crumb coat, and take your time with the final layer. Your first cake might not be perfect, and that’s completely fine. Every attempt teaches you something new.
Here’s the secret: even professional bakers have imperfect cakes. They’ve just learned where to hide the flaws and which angles look best. So don’t stress about making it Instagram-worthy—focus on the process and have fun with it.
Grab your spatula, pick your style, and dive in. There are no cake police. Each cake is a chance to experiment and surprise yourself with what you can create.
Now go make something delicious. Your cake is waiting.